Storing Seeds: How to Preserve Seeds for Years

Contents
If you’re like me, storing seeds is a necessity. You may have particular flowers that you grow every year like geraniums, or a favorite kind of kale or watermelon that you love the taste of. But knowing how to store seeds is incredibly important, as poorly-stored seeds won’t germinate.
No matter if the seeds are large or small, these seed storage tips will help you keep your seeds viable for long periods of time. Even if you just need them to be viable until the next planting season, it’s important to have the right conditions in place!
So if you found that rare seed type you’ve been looking for at long last, go ahead and grab a packet or two, and I’ll go over the best way to save and store seeds for long term use!
Listen to this post on the Epic Gardening Podcast
Subscribe to the Epic Gardening Podcast on iTunes
Learn How To Store Seeds For Years
Those of us who are willing to collect and store seeds year after year have a slight advantage. We don’t need to look at years down the line, only how to get us as far as the next planting season.
Seed Saving: The First Step

Whether you’re trying to decide how to store vegetable seeds or how to store flower seeds for next year, the process is virtually the same. First, you have to save seeds. Allow the plant’s seeds to mature as they normally would, then start collecting seeds!
Once you collect seeds, if there is a gel (such as in tomatoes), you’ll need to remove that gel. It is an added source of food for the seed, but it doesn’t help while preserving the seeds.
To remove this gel, place your gel-coated seeds in a bowl of water with a lid. Once per day, shake them up or stir them. The gel will break down and come off the seeds, and you can then rinse them off entirely.
Drying & Storing Seeds

Once your seeds are bare, it’s time to dry them. Ideal drying temperatures are between 60 and 100°F (16 and 38°C), and your seeds should be spread out in a thin layer on a piece of parchment paper. Place them in a well-ventilated place. Stir them every day or two to ensure that they dry evenly.
If you have a food dehydrator that has extremely low-temperature settings (80-90°F or 27-32°C), you can use this to help dry out your seeds. However, do not run it for more than a half hour at a time to prevent accidentally cooking your seeds. If your dehydrator runs hotter than that, don’t use it!
A fan can help! Place your seeds between two fine-meshed screens (I use air conditioning filters), and use bungee cords to secure the filters to the front of a box fan. Prop your fan on a couple of bricks to allow air to come through the fan from underneath, and turn it on.

Small seeds should dry via forced airflow from a fan in 24-48 hours. Large seeds like pumpkin seeds require much more time, 7-10 days or so.
Once dry, place your seeds into a storage container. This can be paper envelopes inside a Mason jar, a seed storage box, even zip-closure bags with all the air pressed out. Write the type and date on your packets!
Place your seeds in a cool, dark location. 60-65°F (16-18°C) should be fine for collecting seeds for a year.
How To Store Them Properly For The Long Term
What if you’ve got a large seed collection, or are looking to swap out varieties every other year or so? Maybe you’re being proactive and saving seed for survival purposes? The best way to store seeds long-term is to create the perfect conditions for your seeds to dwell in.
The secret is in two words: cool and dry.
Ideally, there should be no moisture around your seeds. The temperature should be 40° Fahrenheit (4° Celsius) or lower, but should not drop into sub-freezing temperatures as that kills some forms of plant embryo. It should be dark or dim, and it should be pest and critter free.
Consider Cold Storage

I recommend using a cold storage option such as a beverage cooler for your seed storage. It’s compact and can be tucked into small spaces easily. Consider getting one with full temperature control so you can set it to your preferred chill level.
While you can hide seeds in the back of your refrigerator, you’re probably going to want to keep your seeds cooler than your food is. Many people store seeds at or around 35-40° F (2-4° C), and the lower end of that scale may cause frost damage to your food.
Having a separate, temperature-controlled location for your seeds is a really good idea. Not only can you optimize for the best long-term seed storage, but you won’t let the cold out multiple times a day when you open the door for food.
Avoid Moisture

A cooler environment will cause moisture to condense more readily. You will need a fully sealed container to keep that moisture out. Alternatively, you can add moisture-absorbing packets or fully dried rice grains to your storage box to keep humidity at bay.
Plastic bags are not the enemy in this type of storage, but you have to be extremely careful that no moisture is trapped inside the bag when you seal it. Press out all air if possible, and make sure it’s completely closed so moisture doesn’t get inside.
Temperature & Light Conditions
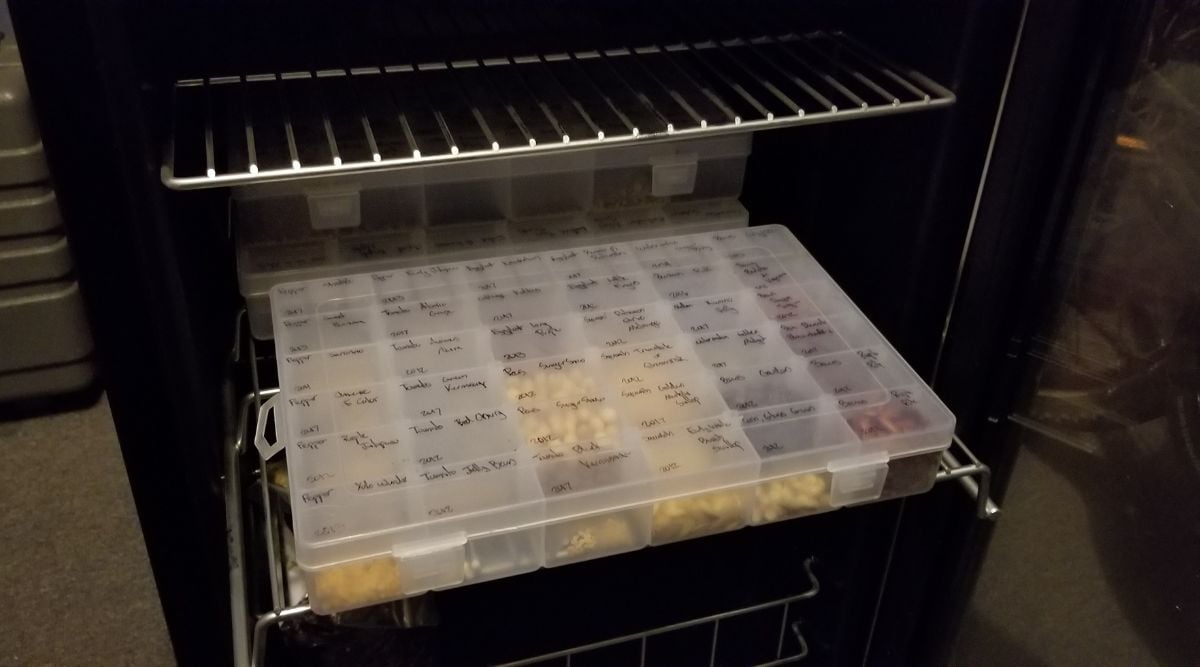
Maintain the temperature at your optimal range. It’s fine if you have to open your cooler every so often to put in or remove seeds, but if there’s too much fluctuation, it can become a problem. I recommend aiming for 35-40° F (2-4° C) as the ideal temperature.
If you can, put your seeds into an opaque packet or inside an opaque box. This adds another layer of light prevention, although the temperature and humidity are the key factors in cold storage like this.
Taking Your Seeds Out Of Cold Storage
When removing your seeds from cold storage, take the box or container they’re in out and do not immediately open it. Instead, set the container somewhere and walk away until it has reached ambient room temperature.
Rapid temperature changes won’t shock your seeds, but a quick temp change can cause moisture to condense inside your container, and it can be difficult to remove before you put your seeds away again. Letting it warm up naturally avoids this issue.
For this reason, I recommend you organize your seeds in boxes based on the planting season. After all, if you to get ready to plant in February, there’s no point in starting seeds slated for July or August, and they can continue to stay stored away.
Dry Storage

All the conditions needed to store seeds in a dry location are the same as they would be for cold storage — minus temperature. Keep moisture out of your seed packets, and ensure they aren’t exposed to light. This keeps them dormant while you’re waiting to plant them.
Dry storage can be in any location that meets this basic criteria. A cabinet, drawer, or shelf are all appropriate places for your seeds. You can store them in their packets. You can also add an extra layer of protection by storing the packets in jars, portfolios, or even in photo boxes.
Jacques and Kevin recently acquired an old card catalog to store the massive amounts of seeds they have. Card catalogs are easy to find second-hand, and they’re great for people who have an ever-growing seed collection. They offer the right light and moisture controls for storing seeds.
Photo boxes tend to be the preferred method of storage for many gardeners as they hold up over time and organize seeds in a pleasing way. You can find clear, opaque, or translucent versions of photo boxes in art stores, and online easily.
How Long Are Seeds Good For?

This is a tricky question, and it really depends on what type of seeds you’re storing as well as the conditions that they’re stored in.
Most annual flower seeds are viable for 1-3 years in optimal cold storage conditions without significant degradation. Perennials can go a bit longer, from 2-4 years.
How long do vegetable seeds last? That’s more difficult to establish, and it may have to do with natural oils in the seeds. The oilier the seed, the more likely that the oils will spoil, and your seed will fail.
Approximate Storage Times
Corn, spinach, parsnips, and alliums such as chives or garlic seem to have the shortest seed life. These tend to have higher oil content than other vegetable types, and you should aim at replacing these types every year.
Every two years, you should replace your onion or leek seeds, bush or pole beans, peppers, beets, parsley, and Swiss chard.
Three years? That’s when you must replace your lettuce, melons, carrots, squash, tomatoes, cucumbers, rutabagas, and Asian greens such as mizuna or bok choy.

Radish seeds and turnip seeds can last up to four years. Brassicas such as broccoli, cabbage, kohlrabi, Brussels sprouts, and cauliflower tend to last 4-5 years, as do kale and collards.
What About Longer Storage?
These numbers are all estimates for the “best by” date. Much like food, seeds don’t immediately go bad once they’ve passed that date. Their germination levels just slowly continue to drop, making it far less likely for them to produce a healthy live plant.
There are reports of people successfully germinating seeds that are decades old, even 80 years later. The subsequent plant has to be very carefully cared for, as it will be initially quite weak. But it is possible! It’s just increasingly unlikely as time goes on.
I would not keep any seeds for more than 10 years at a time if I needed them to remain viable. Even then, 5 years is a better maximum range.
Seeds in the Freezer: Good Or Bad?

Should you freeze seeds? I lean towards “no” overall.
For most, freezing is a risky proposition. Your freezer needs to be able to maintain a constant temperature of -20 to -15. Most of us open up our freezers far too regularly to keep them cold enough to keep seeds preserved.
Residential freezers also aren’t as cold, chilling to -10 to 0 degrees Fahrenheit. Now, if you want to buy a chest freezer that can reach -15 to -20 temps and freeze seeds, they exist, but again… what if the power goes out at an inopportune time and your seeds start to thaw?
This is not to say that freezing is always a bad idea. Seed storage banks do it!
But seed storage banks typically flash-freeze their seeds to chill them very rapidly. They also use large freezers that are opened at most twice a year, and have huge backup generators. At home, we don’t have those options readily available.
In the end, no matter what zombie apocalypse or world war we want to be prepared for, a freezer won’t help. Once the power goes out, your cold storage ends, and you are back to square one. It’s best to store smaller quantities of your favorites for shorter periods of time.
Seed Storage Containers & Supplies

There are a few options for seed storage containment that I’d definitely recommend!
I personally like to store my seeds in coin envelopes. These paper envelopes are a good size to fit into an airtight box. If you want to be doubly safe, you can use a dry box with moisture-prevention seals to keep moisture at bay.
If using paper envelopes, you’ll want some form of desiccant to reduce moisture as much as possible. There are two options: you can use dry white rice to absorb moisture, or you can opt for a silica gel packet.
Do you have a vacuum sealer in the house? If you do, consider mylar bags. You can vacuum-seal these and keep your seeds free from damp air. Larger mylar bags are available if you buy seed by the pound for microgreens!
What if you’ve got a lot of tiny seeds and don’t want to juggle packets? Consider a multiple-chambered storage box like a photo storage box. Each internal box holds multiple packets of seeds, and the seeds will stay neatly separated and organized.
Any of these options can be placed inside cold storage, allowing you to reduce the temperature around your seeds to make it less likely they’ll try to germinate in their packets. And the better your seeds are protected, the longer they’ll last.
What Causes Seed Degradation?

Like all organic materials, seeds will break down over time.
Most of us learned in grade school about the various parts of a seed. As a refresher, there are three major parts. The seed coat is the external hard shell of the seed. Inside, there is the plant’s embryo, along with what’s called the endosperm – a source of food to sustain the embryonic plant.
The plant is dormant while hidden within its hard external casing if stored properly. In the wrong environment, the plant is going to have a hard time “staying asleep” and may start trying to germinate.
Keeping the plant dormant is important, but even if it is, the endosperm will gradually break down, just like any other food product. It is predominantly made of starches, and those last for quite a while, but even they degrade in time.
In addition, some seeds are oil-rich, and the oil can spoil as well. Most often, these are the seeds with the shortest lifespan.
There are other factors which will speed up this degradation. Let’s examine these in a bit more detail!
Light
Sunlight is the enemy when storing many organic products. This is doubly true for seeds because the light stimulates the tiny plant inside the seed. As plants feed on sunlight just as much as they do on the soil, a light source encourages them to try to sprout.
Therefore, it’s essential that you keep your seeds in the dark as much as possible. Opaque containers help quite a lot, but if you don’t have opaque containers, seeds can be stored in a dark environment to prevent as much light exposure as you can avoid.
Moisture

Soil is more than just a source of nutrition for a plant. It’s also what keeps water right at the roots of the plant so the plant’s able to get a drink.
It shouldn’t come as a surprise that moisture can also spur germination. After all, when a seed is below the soil’s surface, light may not penetrate that far, but the moisture will. That’s great if you’re trying to grow alfalfa sprouts, but not so good when you’re trying to store seeds!
Moisture can cause the outer seed wall to soften, which also opens the seed up to the risk of rot. This is the enemy when you’re trying to promote good dormancy. Avoid it as much as possible.
Temperature
Along with moisture, soil temperature comes as a signal to a seed that it’s germination time. However, your seed doesn’t know the difference between being planted in good potting soil and being stored inside a paper envelope.
Since most plants germinate at temperatures above 60 degrees Fahrenheit, keeping them in conditions below that should prevent your seeds from sprouting.
If it’s warm enough that the plant will normally germinate, you’re running the risk of your preserved seeds not staying dormant. And in non-dormant conditions, they will degrade more quickly.
Pests
Have you ever watched a squirrel with an acorn? If so, you know that pests do go after seeds, and there’s a long list. It’s not limited to just rodents like mice, chipmunks, squirrels, or rats. Many insects also consume seeds, and of course, so do larger animals.
It should go without saying that you need to be proactive. Use some form of pest-proof containers. If they’re moisture and pest-proof, that’s even better.

