How to Divide Dahlia Tubers in 9 Easy Steps
If your dahlia tubers need separating this season, we've got you covered. Cut flower gardener Melissa Strauss walks you through dividing those roots for more beautiful dahlias this year.


Contents
Like most tuberous and bulbous plants, you’ll want to divide your dahlia roots every so often. This prevents them from getting crowded and competing for space and nutrients. When you divide dahlia tubers, the number of plants you have in your garden also increases for frewe. Who doesn’t love more dahlias!?
If you’re taking your tubers out of storage to divide them before spring planting, you can skip steps one through five. If you’re dividing them in preparation for storage, you have a bit more work to do.
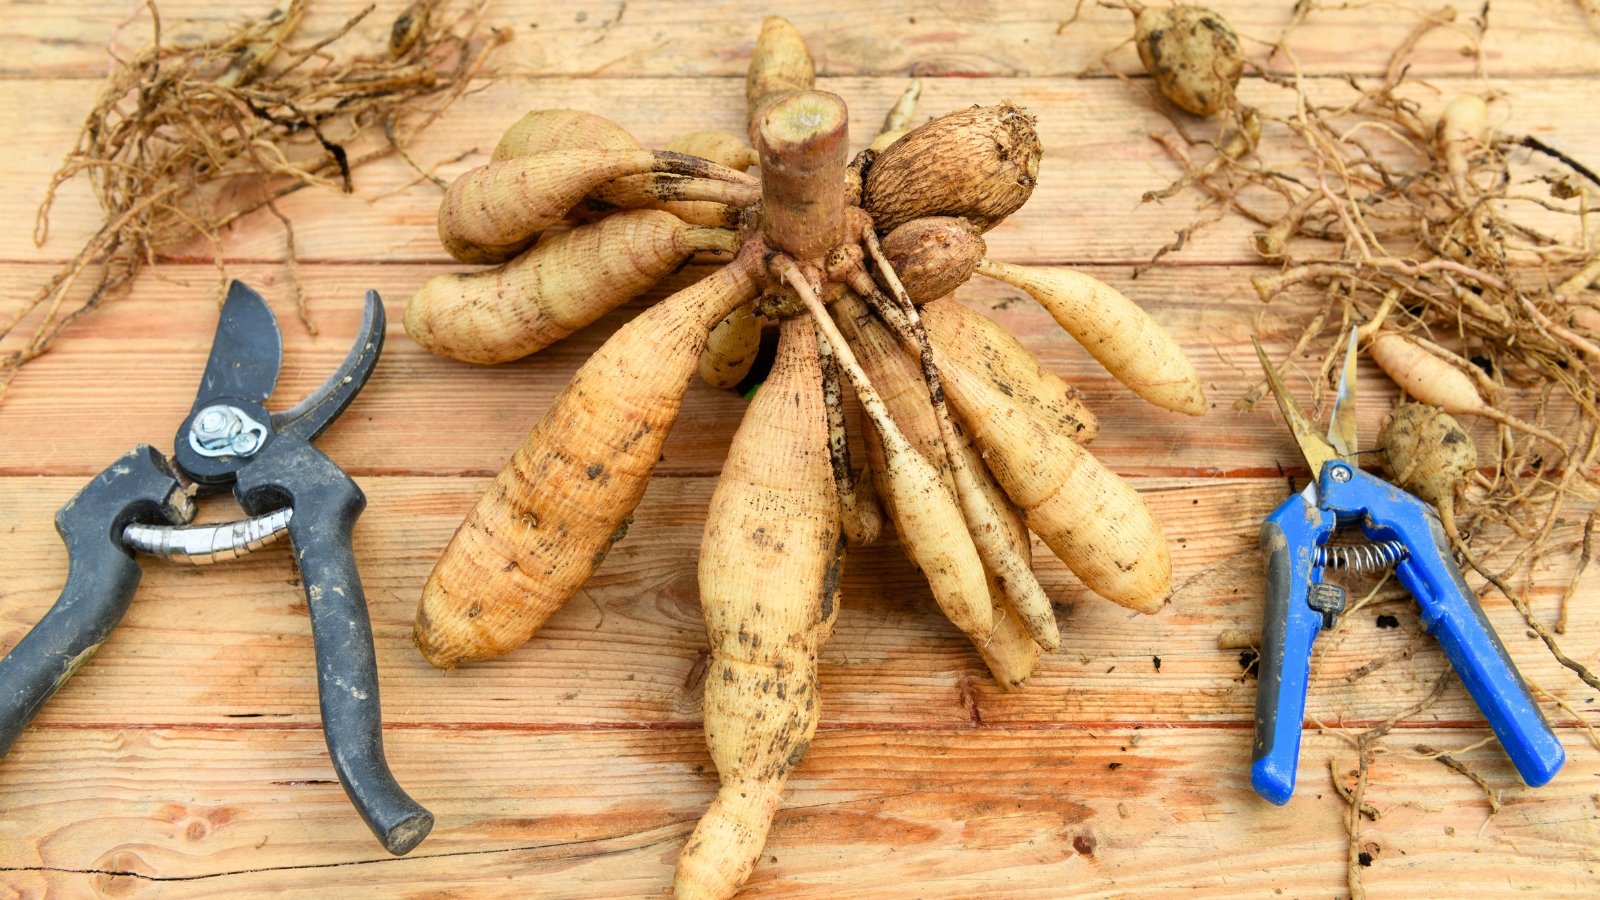
Dahlia tubers are like a cross between a tulip bulb and a ginger root. They are tough on the outside and store energy inside to get your plants off to a vigorous start in the spring. Ranunculuses have a similar root system, only much smaller.
If you live north of zone 8, you’ll need to dig them up in the fall to store them away during winter. In warmer climates, you’ll just want to dig them up every couple of years to divide them and then re-plant them right away. Here are some steps to follow to divide dahlia tubers for healthier, more floriferous plants.
Wait for the First Frost

If you’re carrying this out in the fall, you have a few more steps and some timing to concern yourself with. Namely, it’s important to wait for the right time to dig up your tubers for the winter. You want to give them as much time as possible to store up energy and create new tubers for the next season. The stronger those tubers are, the better they will perform next year.
The sweet spot for unearthing your roots is after the first hard frost but before the ground freezes. The foliage is frost tender and will die back when the weather gets cold. If possible, wait until the stems and foliage turn brown to remove them. Just don’t wait so long that the ground freezes, as this will kill the roots.
Prep for Harvest

A few days before you dig them up, you’ll want to cut your stems down to about two or three inches tall. Doing this encourages the tubers to form eyes. These visible eyes make it much easier to divide them. Once you remove the stems, the plant will refocus energy on producing new stems, which form from the eyes.
Dahlia stems are hollow, which makes them great for transporting water to their substantial flowers. What you don’t want is to cut them and have them fill up with water if it rains. If there is rain in the forecast for the next week, cover the open stems with plastic to keep the water out.
Be sure to use a clean, sharp tool to cut those stems. Remember that you are opening them up to diseases and leaving them vulnerable. You don’t want to introduce any harmful pathogens that may be present on your pruners. A solution of one part bleach to ten parts water will clean them up nicely.
Dig Carefully

Dahlia tubers may look tough when you purchase them, but at this stage, the skin isn’t cured and will be easy to damage. This means that when you go to dig them up, it’s important to be gentle and cautious about where you dig and how hard.
Ideally, a garden fork is the best tool for this task. Use it or a small trowel to loosen the soil in a one-foot diameter all the way around. Then, aim to lift the entire cluster of roots from underneath. I tend to be too cautious, even for a trowel and will often use my hands to lift them out after loosening the surrounding soil.
Wash Thoroughly

After lifting them out of the ground, use your hands to gently work as much of the soil out from between them as possible. Soil carries pathogens that can cause diseases if they get into an open wound, which your tubers will have after you divide them. If you’re storing them, it’s extra important to remove all the soil.
After you work out as much of the soil as possible by hand, wash your roots in room-temperature water. Again, the objective is to leave no soil behind that could harbor harmful pathogens. Be careful about this task, as you don’t want to break apart that cluster just yet.
Let Them Dry

Once they are clean, allow your tubers to dry completely. I lay them out on a tray covered in a couple of layers of paper towels or a tea towel. Set them in a cool, dry spot to allow any water to dry and the skin to toughen up a bit.
If you’re storing them for the winter, allow them to cure for a couple of days. You want the skin completely dry, but the inside shouldn’t dry out. If this happens, you’ll see the skin begin to wrinkle as the inside dries out and shrinks.
Use the Right Tool
It’s important to use a clean, sharp tool to do your cutting. You’ve eliminated any pathogens left behind by the soil. Now, you want to avoid contaminating them with any potentially harmful materials left behind on your tools from other plants.
Depending on the size and density of the tubers, you may require a certain type of tool. For smaller, more delicate ones, a sharp knife will give clean cuts that heal quickly. You want them to heal as fast as possible because if you plant them with these open wounds, pathogens in the soil can cause them to rot.
If you’re working with larger and more fibrous roots, you may need a larger tool. A sharp, pointed set of harvesting snips or shears will work in this situation. A sharp knife could still do the job, or a hori hori knife may come in handy.
Whatever you use, make sure that it’s clean to avoid diseases. The other important factor is sharpness. Sharp tools make cleaner cuts, which heal faster. If you have to work to cut through your roots, you risk tearing them up, and then they take longer to heal, making them more vulnerable.
Remove Non-Viable Tubers

At this point, if you’re taking them out of storage, this is the step to take. Inspect your roots carefully to determine their health. Identify any cracks and dried-out roots with wrinkled skin.
Some may be so dried out that the interior is crumbly, while others may just look like the raisin version of a tuber. Remove these using your sharp, clean tool by cutting them at the narrow point where they join with the neck, which is the leftover stump of a stem.

Identify the Eyes

Before you start dividing the healthy roots, there is an important key to determining where you should make your cuts. You need to identify the eyes. Think of a potato that’s been sitting in the pantry for too long. It will start to produce small bits of growth where the buds are. These are the places where stems will grow and eventually form new plants.
It’s the same in dahlias. The new plants will develop from the eyes or buds. Inspect your clusters around the neck or the place where they join together. Look for small nodules that are green or white and look like new growth rather than the brown papery skin of the roots.
Cut your tubers apart based on these eyes. Each division needs to have at least one eye. If every tuber has an eye, that’s great! You can cut them all apart individually. If you have any that don’t have an eye, you can leave them attached to one that does. That plant will use the additional energy stored to produce foliage and, eventually, flowers.
Make Clean Cuts

It bears repeating once more that when you divide your dahlia tubers, you want those cuts to be clean—not only clean in terms of harmful materials but also neat and tidy. Jagged cuts take longer to heal, and your plant will apply energy to that rather than growth. Once you’ve completed this process, your newly divided roots are ready to plant on their own.


